You’ve done the hard part. Compared quotes. Checked references. Negotiated payment terms.
Then you wire the deposit. And then — silence.
For the next six to eight weeks, you’re staring at your inbox thinking: is anything actually happening over there?
Yes. A lot is happening. Most of it isn’t visible to you because nobody in this industry is good at sending updates. But if you walked onto the shop floor of an
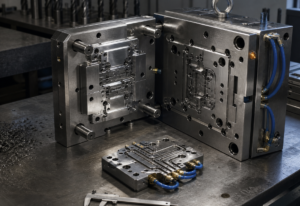
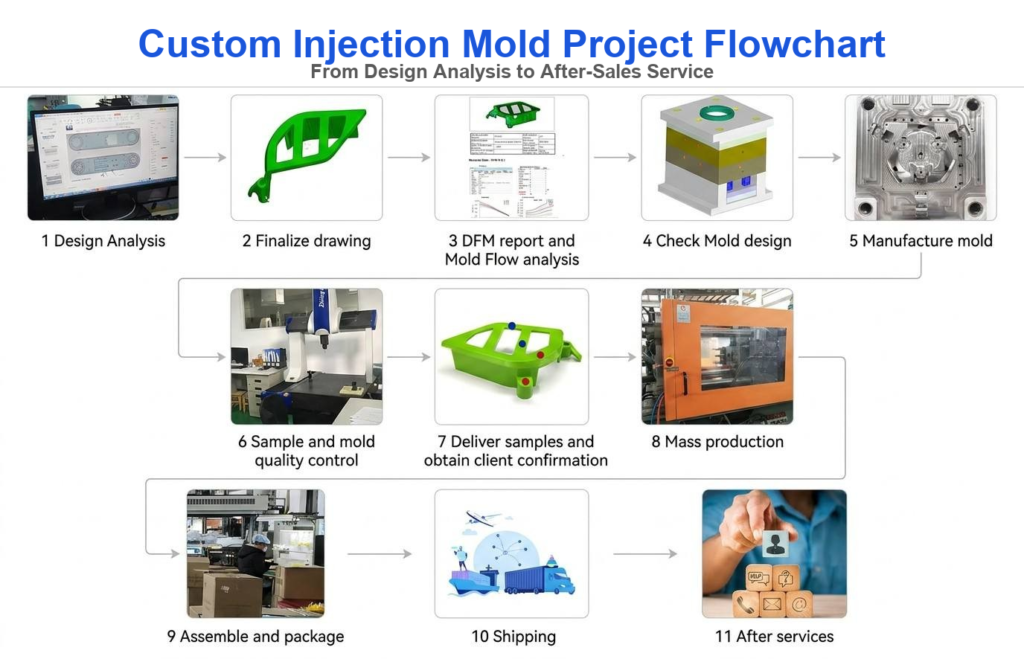
Yes. A lot is happening. Most of it isn’t visible to you because nobody in this industry is good at sending updates. But if you walked onto the shop floor of an injection mould manufacturer on Day 3 after your deposit cleared, here’s exactly what you’d see.
Week 1: Steel procurement and DFM lock-in
The deposit hasn’t even fully cleared, and someone has already ordered steel.
This sounds fast, but it’s not optional. If the steel doesn’t arrive by Day 5, the entire schedule slides. A good shop pre-orders standard grades (P20, 718H) for common mold sizes and only orders specialty steels (S136, H13) per project.
The same week, the
The same week, the DFM injection molding engineer finalizes the parting line, gate locations, cooling layout, and ejector pin placement. If you approved the DFM before paying, this is just a final review. If you paid first and asked for DFM after, the clock hasn’t really started yet — and that’s a three-day penalty you could have avoided.
What you should receive this week: a confirmed steel purchase order and a locked DFM drawing. If your supplier doesn’t send these, ask.
Week 2: Rough machining — the big metal removal
This is the loud week.
Large blocks of steel get clamped onto CNC machining centers. The goal isn’t precision yet — it’s bulk material removal. The cavity contours start to emerge from the raw block, but there’s still 0.3 to 0.5mm of material deliberately left on every surface.
Why leave material? Because rough machining generates heat. Heat means thermal expansion. If you cut to final dimensions while the steel is hot, those dimensions will be wrong when it cools down. The extra 0.3mm buys a margin for error.
While rough machining is running, the electrode department starts cutting graphite or copper electrodes for the EDM stage next week. Electrodes are mirror images of the cavity geometry — they’re the tool that will burn the final shape into the steel.
Week 3: Semi-finishing and heat treatment (if required)
The rough-machined insert now goes through semi-finishing. The 0.3mm margin gets reduced to about 0.1mm. Surface finish at this stage is rough — maybe Ra 6.3 — but the geometry should now be within 0.05mm of final dimensions.
If the mold steel requires heat treatment (H13, for example, needs to hit HRC 48-52), this is where it happens. The insert goes into a vacuum furnace, gets heated to around 1,020°C, quenched, and tempered. This process takes 24-36 hours.
Here’s a thing most buyers don’t know: heat treatment causes dimensional change. A 200mm insert can warp by 0.1mm during quenching. A good shop accounts for this and leaves extra stock. A bad shop doesn’t, and you discover the warp during final inspection when it’s too late to fix without welding.
Week 4: EDM and final machining
This is where the mold starts looking like a mold.
EDM — electrical discharge machining — is how you create sharp internal corners, deep ribs, and complex geometries that a rotating cutter can’t reach. The graphite electrodes made in Week 2 now get mounted onto the EDM machine, and the final cavity geometry gets burned into the steel, one spark at a time.
A multi-cavity mold takes longer here because each cavity needs its own electrode set. A 4-cavity mold means four times the EDM hours. This is the single biggest schedule driver that doesn’t appear on most Gantt charts.
While EDM is running, the mold base gets machined: water lines get drilled, ejector pin holes get reamed to H7 tolerance, and the parting line surfaces get ground flat to within 0.02mm.
Week 5: Fitting, polishing, and assembly
Everything comes together this week.
The cavity inserts get fitted into the mold base. Ejector pins get installed and clearance-checked. Slides and lifters get assembled and tested for smooth movement. The cooling circuits get pressure-tested at 10 bar — you find water leaks now, not on the injection molding machine.
Then polishing. If the part requires a mirror finish (SPI A-1 or A-2), this takes a full day per cavity. A single scratch from a diamond paste that was one grit too coarse means starting over.
This is also the week where most delays are born. A slide binds. An ejector pin is 0.01mm too tight. A parting line doesn’t seal perfectly. Every one of these problems is fixable, but each one costs a day. A shop with experienced fitters catches them early. A shop with apprentices discovers them during assembly and loses the week.
Week 6: First mold trial
The mold goes onto the injection molding machine for the first time.
Nobody expects perfect parts from Trial 1. The goal is to verify:
- Does the mold open and close smoothly?
- Does it fill completely?
- Does it eject without sticking?
- Are there obvious defects — short shots, flash, sink marks?
The first trial typically produces 50-100 shots. The process engineer records every parameter: melt temperature, injection pressure profile, holding pressure, cooling time, mold temperature. This becomes the baseline process sheet.
Then the bad news: something is always wrong. Always. A weld line in an unacceptable location. A slight flash at the parting line. An ejector mark that’s deeper than the specification allows. This is normal. This is why there’s a Week 7.
Week 7: Correction and optimization
Based on Trial 1 results, the mold goes back to the bench for adjustments:
- Flash at the parting line? The parting surface gets spot-ground or the clamp force gets adjusted.
- Weld line in a visible area? Gate location might need changing, or the mold temperature gets raised to let the flow fronts knit better.
- Ejector marks too deep? The ejector pin stroke gets adjusted, or the pins get polished.
Then Trial 2. Then maybe Trial 3.
A mold that produces acceptable parts on Trial 1 is rare. A mold that takes three trials is average. A mold that takes five trials means something went wrong in the DFM stage and you’re now paying for it in time.
This is the week that separates shops that quote 6-week lead times from shops that deliver in 6 weeks. Everyone quotes 6-8 weeks. The ones who hit the number are the ones who budgeted two rounds of correction into the schedule.
Week 8: Final inspection, texture, and packing
Parts from the final trial go to the CMM room for dimensional inspection. Every critical dimension gets measured. If a dimension is out of tolerance, the cavity gets reworked and the mold gets trialed again.
If the part requires a surface texture — VDI 3400 or Mold-Tech standard — this is the final step. Texture is applied to the cavity surface using chemical etching or laser. This doesn’t change the cavity geometry measurably, but it dramatically changes how the part looks and feels.
Once inspection passes, cleaning begins. Every water line gets flushed. Every moving part gets coated with anti-rust oil. Spare parts get packed in a labeled case. CAD files, electrode drawings, the mold trial report, and the process parameter sheet get compiled onto a USB drive or uploaded to a shared folder.
Then the mold gets bolted to a wooden pallet, wrapped in VCI (volatile corrosion inhibitor) film, and sealed inside a plywood crate. It’s forklifted onto a truck, driven to the port, and loaded onto a container ship.
What the buyer should be doing during these 8 weeks
Your biggest risk isn’t that the mold will be bad. It’s that you’ll be unprepared when it arrives.
During these 8 weeks:
- Confirm your injection molding machine is available and the barrel is clean. A mold arriving to a machine mid-maintenance is a two-week delay.
- Order the raw material. If your part runs PA66-GF30, and that material has a 3-week lead time from your supplier, order it by Week 5. The mold doesn’t run itself.
- Prepare your QA team. Send them the DFM report and trial photos. They should know what to inspect before the first part lands on their bench.
- Book your mold trial slot. If you’re qualifying the mold at your facility, the machine needs to be scheduled. If at the supplier’s facility, confirm the date.
One final thing
Eight weeks feels like forever when it’s your money. But inside that factory, every day is accounted for. Steel. Roughing. EDM. Assembly. Trial. Fix. Trial again. Pack. Ship.
The silence is uncomfortable, but it’s not a sign that nothing is happening. It’s a sign that your supplier is bad at communication, not bad at mold making. (Ideally they’d be good at both. But if you have to pick one, pick the mold making.)
Next time you wire a deposit, ask for a weekly photo update. Most shops will say yes if you ask. They just won’t offer because they assume you don’t want to be bothered.
And if you’re shopping for a supplier who actually communicates, talk to
And if you want a supplier who actually sends those weekly photos without being asked, have a look at our mold manufacturing services. We build molds. We also answer emails. Apparently that combination is rarer than it should be.
————————————————————————————————————————
Author: Jack Qiao manages engineering projects at Kysen Mold, a Shanghai-based injection mold manufacturer with a 1,120 sqm facility and ISO 9001 certification. He has personally walked molds through the process described above more times than he can count, and still finds Week 7 the most stressful.
Website: www.kysenmold.com